A Data Hunting Overview

A guide to data hunting during engagements.
- Background
- Data Hunting
- Data Sources
- Conclusion
- References
Background
Getting domain admin access is hardly ever the goal of penetration tests/red team assessments, unless it’s explicitly stated by the client of course. That said, having DA access in a target’s domain makes it a lot easier to take action on your actual objectives; which is why a lot of us will prioritise acquiring it during the privilege escalation phase of our engagements.
Some clients are kind enough to give testers specific objectives/expectations while others will give us “creative freedom” to get our point across. One way or another, you’re probably going to end up exfiltrating business sensitive data to prove the impact of your compromise.
A lesson I’ve learned the hard way is that even with the keys to the kingdom (DA privileges), blindly hunting around for data to exfiltrate in large networks can be an incredibly challenging and even unproductive task if you go about it without a plan. Aimlessly hopping from one system to another while looking for sensitive data can take a lifetime or worse; get you caught.
Data Hunting
So what do I mean by “data hunting”?
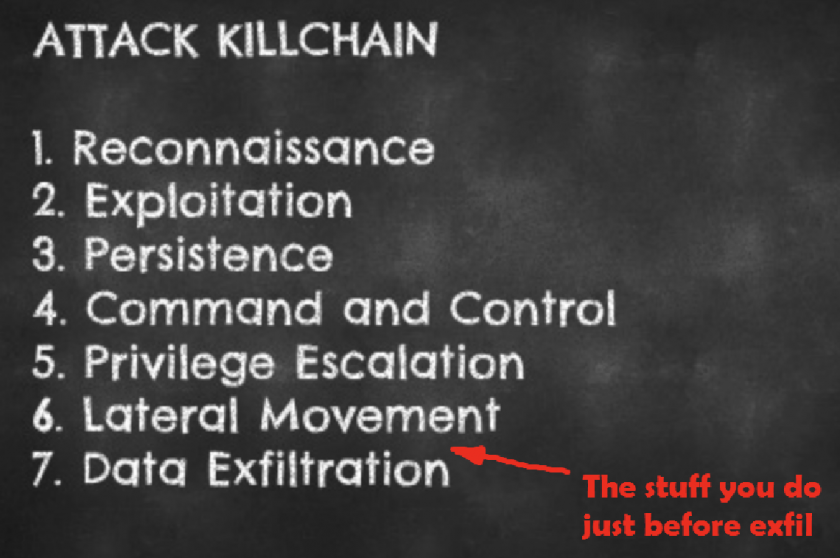
Data exfiltration gets most of the attention when we’re discussing attacks but I like to believe that identifying the data sources is just as important as exfiltrating the actual data; you can’t steal what you can’t see 😉
This post
- This blog post isn’t meant to be a detailed “how-to” guide to data hunting. I’m just trying to emphasize the importance of having a structured approach to hunting the data you intend to exfil. I’ll still go over the basic usage of a few techniques, shell commands and tools that can be used to identify and abuse various data sources.
- I’m not going to focus on the actual pillaging/exfiltration of the data, that’s an entirely separate phase of its own.
- Data hunting occurs during post-exploitation, so I’m going to assume compromise. A lot of the techniques will also assume that unrestricted domain access (e.g. DA privs) has been acquired, though not every technique covered requires such privileges.
Data Sources
Data Sources Data hunting can be split into 2 general categories:
- Host-based data hunting - hunting for data to exfil on a single local host.
- Network-based data hunting - hunting for data to exfil across a network.
I’ll go over methods that cover both these categories.
1. Network shares and fileservers
Network shares and fileservers are really common in enterprise networks. I’ve been to plenty of organisations with a server or two that contain shared folders assigned to various departments e.g. HR, Marketing, Finance and so on.
I’ve had successful engagements where I didn’t even get DA access but I had compromised a few users that could access their department’s shared folders, allowing me to exfil sensitive data with minimal privileges.
So how do we find these shares and fileservers? The commands below should help out.
# List shares on the local host
net share

# List network computers
net view

# List shares on a remote PC
net view COMPUTER_NAME /all
Another technique I’m a huge fan of is using an organisation’s computer naming conventions to identify critical assets. Hackers love standardized naming conventions just as much as sysadmins do.
The command below will list all computers that are a part of the “Domain Computers” group and filter all computers that have “FILE” in their name.
# List all domain computers and filter all computers with "FILE" in their name
net group "Domain Computers" /domain | findstr "FILE"
Understanding your client’s naming convention can make target identification a breeze. Use these naming conventions to hunt for servers with promising string in their names (file, share, production, prod, erp, hrms etc.).
Powerview, written by Will Schroeder is an invaluable data hunting tool. Once you’ve loaded it into memory, you can automate the discovery of network shares and fileservers with a few simple cmdlets.
# Find network shares and fileservers using Powerview
Find-DomainShare
Get-DomainFileServer
Powerview is also built into Empire, so if you already have an Empire agent on your target you can use Powerview directly from it.
# Powerview modules in Empire:
situational_awareness/network/powerview/share_finder
situational_awareness/network/powerview/get_fileserver
2. Databases
An enterprise network is highly likely to have a few database servers lying around. Dumping data from databases is a great way to show the impact of compromise during assessments.
I recently started getting familiar with PowerUpSQL and I’m already in love with it. PowerUpSQL is written by Scott Sutherland and is a toolkit used to discover, enumerate and attack Microsoft SQL Servers.
I’ll quickly go over the MS SQL attack process using PowerUpSQL.
i) Recon
# Find all local SQL instances
Get-SQLInstanceLocal -Verbose

# Find all SQL instances across a domain/network
Get-SQLInstanceDomain -Verbose
Get-SQLInstanceBroadcast -Verbose
Get-SQLInstanceScanUDP -Verbose
The network discovery techniques above are noisier than Get-SQLInstanceLocal, so you should remember that if you’re trying to avoid detection.
ii) Enumeration
So you’ve identified a local/remote SQL instance and want to enumerate it a little further?
# Enumerate basic information about local SQL instances
Get-SQLInstanceLocal | Get-SQLServerInfo

# Enumerate basic information about a remote SQL instance
Get-SQLServerInfo -Instance "COMPUTER_NAME"
ii) Exploitation
# List SQL instances that can be logged into as the current domain user
Get-SQLInstanceDomain -Verbose | Get-SQLConnectionTestThreaded -Verbose -Threads 10

# Attempt to gain admin rights on an SQL instance (unnecessary if you're already admin)
Invoke-SQLEscalatePriv -Verbose -Instance "COMPUTER_NAME"

# List SQL instances across the domain using default passwords
Get-SQLInstanceDomain -Verbose | Get-SQLServerLoginDefaultPw -Verbose

# Dump SQL Server and database information to csv or xml files.
Invoke-SQLDumpInfo -Verbose -Instance "COMPUTER_NAME"

# Run numerous audit functions against an SQL server
Invoke-SQLAudit -Verbose -Instance "COMPUTER_NAME"
NOTE: Be very careful with the Invoke-SQLAudit command. It runs a lot of checks, making its output REALLY extensive and I wouldn’t recommend running it against multiple hosts at the same time. If you want to run specific checks rather than running all of them in one go, check out PowerUpSQL’s audit functions and pick the individual checks you’re interested in running.
What about other database technologies?
Most companies won’t just be using MS SQL servers. There’s likely to be sensitive data sitting in other databases technologies as well e.g. MySQL and PostgreSQL.
One common method of detecting non-Microsoft databases is running a network scan looking for default database ports, I’ve listed a few of these below.
| Port | Database |
|---|---|
| 1433 | Microsoft SQL |
| 3306 | MySQL |
| 5432 | PostgreSQL |
| 27017 | MongoDB |
Once you’ve identified these database servers, you’re probably not going to be able to login to them using domain credentials, but there are still ways to gain access to them, I’ll go over a few in the “Admins & Other High Value Targets (HVTs)” section below.
3. Network Attached Storage (NAS)
Network Attached Storage (NAS) are devices that provide centralised data storage services to other devices on the network that they are connected to. A NAS device in an enterprise network is almost always a promising location to find some sweet loot. Plenty of vendors offer NAS storage devices e.g. Seagate, Synology, QNAP, EMC, Western Digital etc. So keep on the lookout for login portals that may belong to NAS devices.
Most of these devices allow administration via a web portal and regular terminal services e.g. SSH. Remember to check for default passwords on ALL available administration channels; a lot of admins will change the default password on the channel they use frequently and leave the other(s) using default credentials.
I’ve listed a few common NAS username and password combinations below. If you identify a NAS login portal, a quick Google search (“DEVICE_NAME default password”) is often all it takes to compromise it.
| Username | Password |
|---|---|
| admin | admin |
| admin | password |
| root | nasadmin |
| nasadmin | nasadmin |
| admin | [no password] |
4. Admins and other High Value Targets (HVTs)
This source and the 2 that follow it (Exchange & Office 365) are my favorite methods for data hunting during engagements. System administrators and other High Value Targets (HVTs) are usually the easiest way to identify sensitive data in a target network.
Don’t forget, HVTs aren’t just sysadmins, developers, database admins and other technical users. In fact, you can often prove higher compromise impact by exfiltrating data from non-technical users e.g. C-Suite, Human Resources, Finance, Internal Audit and so on. I’ve often found myself biased towards hunting sysadmins and forgetting to go after data from these non-techs.
i) User Hunting
So how do we find these target user’s PCs in a network?
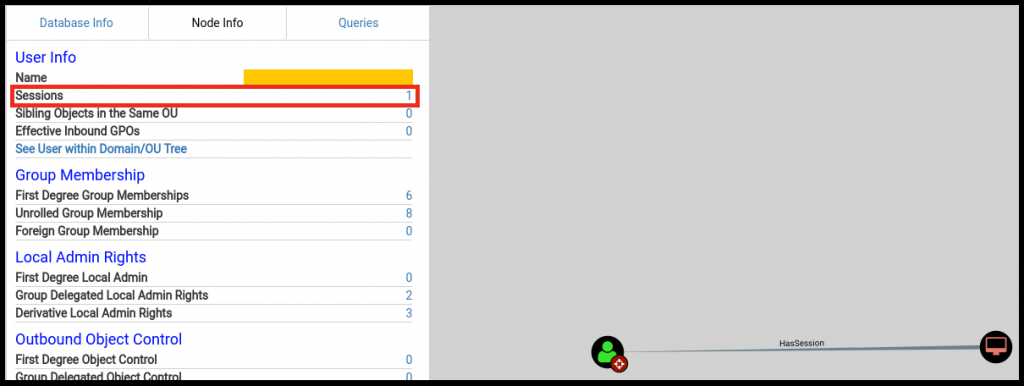
Bloodhound is the go-to tool for active directory recon and I’m sure it’s on every pentester’s post-compromise playbook. Once you have Bloodhound up and running with data collected from your target network, hunting for users/systems is as simple as typing their name into Bloodhound’s search bar.
Once you’ve identified the user you want to hunt, click on the session’s button to figure out which systems they have an active session on; that’s probably going to be their workstation. Only sysadmins are likely to have multiple sessions in an enterprise network.
You can also hunt for HVTs in Bloodhound using the domain groups they’re a part of.

But what if your user didn’t have an active session at the time you collected your Bloodhound data and you want to hunt for their workstation without collecting Bloodhound data all over again.
We can use Powerview’s user hunting function to quickly find where a target user is currently logged in.
# Find where a specific user is logged in using Powerview:
Find-DomainUserLocation -UserIdentity USER_NAME

# Find where a group of users are logged in using Powerview:
Find-DomainUserLocation -UserGroupIdentity GROUP_NAME

# Powerview modules in Empire:
situational_awareness/network/powerview/user_hunter
Great, so we’ve identified some target users. Now we can login to their workstations and hunt for sensitive data on their PC.
ii) Local Data Hunting
Browser data
Dumping browser data is also a common host-level exfil technique but I couldn’t skip mentioning it since it’s gotten me plenty of valuable loot during past engagements. Lots of user’s still allow their browsers to save their passwords without using master passwords or password managers.
# Metasploit modules
post/windows/gather/enum_chrome
post/multi/gather/firefox_creds
post/firefox/gather/cookies
post/firefox/gather/passwords
post/windows/gather/forensics/browser_history

# Empire modules
collection/ChromeDump
collection/FoxDump
If your tools fail you, which they often do, it’s important to know how to get the data you’re interested in manually.
A dirty little trick I learned from a friend a long while back is downloading a target user’s entire Firefox browser profile, importing it into a browser in a virtual machine I control and then opening the browser and browsing as if I was at the user’s PC.
This should maintain their session data for most sites, so you should be able to access all the sites they were using at the time you downloaded their profile without needing their passwords 😀
# Firefox profile location
C:\Users\TARGET\AppData\Roaming\Mozilla\Firefox\Profiles
Remote access data
If you compromise an admin’s workstation, there’s a good chance you may be able to exfiltrate data that gives you access to other critical assets on the network.
Below are some modules that might help you out with this.
# Metasploit modules
post/windows/gather/enum_putty_saved_sessions

# Empire modules
collection/netripper
credentials/sessiongopher
NOTE: I personally haven’t had much success with Netripper, but I’m willing to testify for SessionGopher’s results against admins.
If you realise an admin frequently accesses a system you can’t easily acquire credentials for using the tools above, then you can keylog them and (hopefully) get the credentials you’re looking for.
Local file searching
Local file searching is very basic and very effective. The native commands below should help you identify some potentially interesting files.
# List a target user's recently accessed files
dir "C:\Users\TARGET\AppData\Roaming\Microsoft\Windows\Recent"

# Search for files with specific extensions
dir *.docx *.xlsx *.pdf /s

# Search all .txt and .csv files for occurrences of "root", "username", "password" and "pass"
findstr /S/I "root username password pass" *.txt *.csv
Powerview is back again with some cool file searching functionality.
# Find all files accessed within the last week
Find-InterestingFile -LastAccessTime (Get-Date).AddDays(-7)

# Find all documents containing the words "private" and "confidential"
Find-InterestingFile -Include private,confidential

# Find all MS Office documents on a remote share
Find-InterestingFile -Path \\SERVER\Share -OfficeDocs
5. Microsoft Exchange and Outlook Web App
If you did your initial recon well enough, it shouldn’t be difficult to discover external email access portals; look for URLs with mail, webmail, exchange, owa and other similar terms in them. Once you’ve identified external email access portals, you can use your admin access to hunt HVTs, dump their domain passwords and login to these portals.
One common technique to use once you’ve compromised a user’s mailbox is to setup an Outlook rule to forward all emails they receive to a separate email address that you control.
Another frequently abused email data hunting method is using the search bar present in all Outlook web clients to search a user’s email for sensitive string. Below is a list of some generic terms to search a target user’s inbox for:
password, pass, credentials, creds, vpn, ssh, root, confidential
NOTE: I should mention the difference between generic search terms and target specific search terms. The search terms above are generic and likely to work in any environment, but if you’re on an engagement where you’re targeting data that’s specific to your client, then you should also prepare a list of search terms to use in that specific environment e.g. searching for “credit card” in financial institutions.
MailSniper
MailSniper written by Beau Bullock is a cool tool that allows you to automate the mailbox search process above using Powershell.
i) Invoke-SelfSearch
If you have a single user’s credentials, you can use MailSniper to search their inbox:
# Autodiscover the target Exchange server and search user@example.com's mailbox
Invoke-SelfSearch -OutputCsv local-results.csv -Mailbox user@example.com

# Specify a remote Exchange server (Exchange Online in this case) and search user@example.com's mailbox
Invoke-SelfSearch -Remote -ExchHostname outlook.office365.com -OutputCsv local-results.csv -Mailbox user@example.com
NOTE: By default, MailSniper searches 100 of the target user’s most recent emails for the string “password”, “creds” and “credentials”. You can specify custom search string by using the “-Terms” option.
ii) Invoke-GlobalMailSearch
If you have Exchange admin privileges, you can search the ALL mailboxes in an organisation’s for sensitive string using Invoke-GlobalMailSearch.
# Specify the target Exchange server and use MailSniper's default search settings on all mailboxes
Invoke-GlobalMailSearch -ImpersonationAccount TARGET_USER -ExchHostname Exch01 -OutputCsv global-results.csv
NOTE: Contrary to popular assumption and much to my surprise, Domain Admins DON’T have Exchange administration rights. The group with full control of Exchange is the “Exchange Organization Administrators” or the “Organization Management” group. So compromise a user in these groups or use your DA access to add any user to them if you want to use MailSniper’s Invoke-GlobalMailSearch.
6. Office 365
A lot of organisations are moving their email to the cloud, it’s convenient and it’s supposed to be more secure. Unfortunately, majority of the organisations I know of haven’t implemented security measures such as 2 factor authentication, leaving their Office 365 emails just as exposed as they were when they were using internal Exchange services.
MailSniper doesn’t support Office365, meaning we can’t use it to automate the string searching process like we did above. But a 2 year old blog post written by Oddvar Moe is evidence that sometimes native tools and features are all we need to get the job done.
Compliance Search
The post above walks through the process of using an Office 365 feature called Compliance Search to search ALL mailboxes in an organisation for specific string, much like MailSniper does.
I’m not going to document the process; the blog post above explains it much better than I ever could. I’ll only mention the prerequisites and summarise some of Compliance Search’s coolest features.
- You’ll need to acquire the domain credentials of an Office 365 admin. What I’ve noticed is that a lot organisations will grant Office 365 admin privileges to users in Exchange admin groups, so that would be a great place to start hunting for Office 365 admin users.
- Next, you’ll need to login to the Office 365 admin portal.
- Follow the steps in this blog post to setup a compliance search.
- Extract a single Outlook (.pst) file with the compiled results.
- The .pst file will only include emails from your target group.
- The .pst file will only include emails with your search terms.
- The emails in the .pst file also includes email attachments!
- Import the .pst file into Outlook in a Windows host you control and profit.
NOTE: Be very careful when using compliance search against an entire organisation’s mailboxes. The output file you get can end up being REALLY huge (I’ve seen output files that went into the terabytes). It’s much wiser to only target a few user’s mailboxes at a time, even if it means having to configure multiple custom searches.
Conclusion
Don’t blindly dive into data-exfiltration during your engagements. Prepare a structured approach ahead of time so when the time comes to go hunting for sensitive data, you don’t end up having one of those “where do I even start?” moments. I’ve been there and it sucks.
I’m more than willing to update this post with more techniques, so feel free to give me a shout if you’d like to contribute. Happy hunting 🙂
References
- http://about-threats.trendmicro.com/cloud-content/us/ent-primers/pdf/how_do_threat_actors_steal_your_data.pdf
- https://www.mwrinfosecurity.com/assets/Whitepapers/mwri-detecting-deterring-both.pdf
- https://azeria-labs.com/asset-discovery/
- https://github.com/PowerShellMafia/PowerSploit/blob/master/Recon/PowerView.ps1
- https://github.com/HarmJ0y/CheatSheets/blob/master/PowerView.pdf
- https://www.sans.org/security-resources/sec560/windows_command_line_sheet_v1.pdf
- https://github.com/dafthack/MailSniper
- https://www.blackhillsinfosec.com/introducing-mailsniper-a-tool-for-searching-every-users-email-for-sensitive-data/
- https://msitpros.com/?p=3678